Sunday, October 31, 2010

Bugger Off!

Happy Halloween!

I don't know if I am PMSing (painting missing sex) or just being a prick but the FOW thread I started to showcase my minis has been seeing a few posts of others work lately and I may have took it too seriously. Kind of feel like a jerk about it but it seemed at first to be a deliberate hi-jack...

Renamed the thread from "My First Flames of War Miniatures" to "Ritterkriegs FOW Miniatures" to clear up any confusion. Am I getting too self-centered?! Comments welcome!

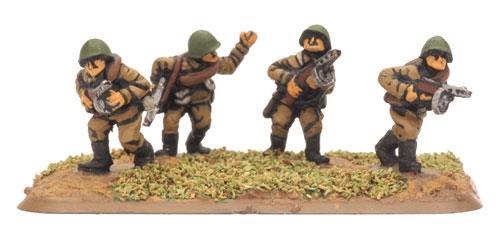
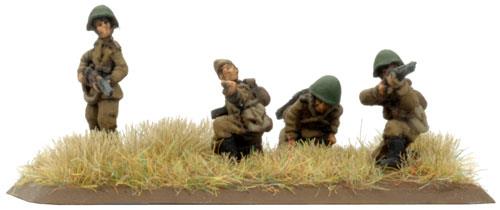
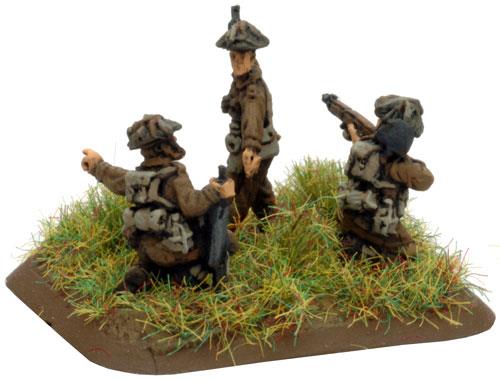
Currently, on the painting table, I am priming up the next 8 Russians and a T-26 (you know, for when I get bored!) Should have a pic up soon...


Tried out the IWATA airbrush yesterday on a PaK 37. WoW!! Smooooth! Kicks my old badgers ass! Panel shading was a snap. Control, ease of use, and clean-up were awesome! Especially as the subject was so small!  I am going to try it out on the T-26 tomorrow. Post up some pic when done...

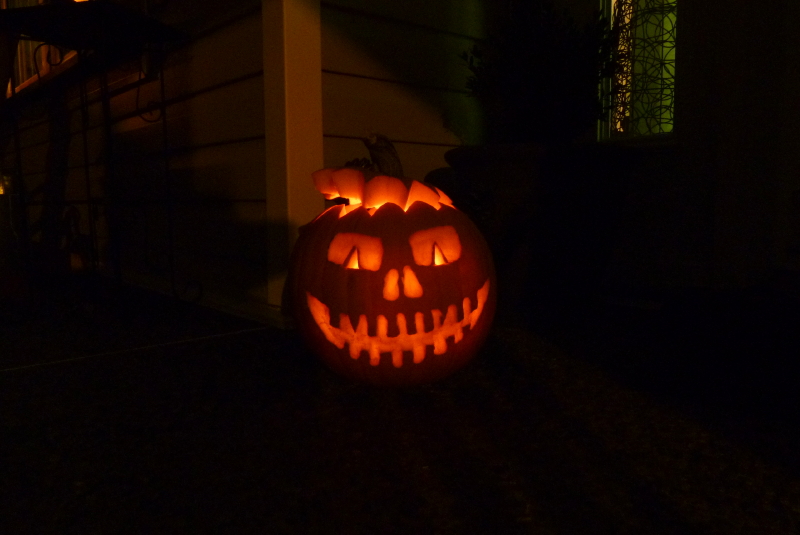
Anyway, had a near miss tonight when I was setting off fireworks for the kids out in the yard. There was this big, squat tuna-can shaped bastard of a firework. Didn't look as if you could bury it as the fuse was set low. Anyway set it on the ground and lit it...1st shot straight up, second shot horizontal toward neighbours house, (damn thing fell over!), third toward our car, 4th hit other neighbours house so hard, it broke siding and burned a hole.

No one hurt - thank the firework gods, I wonder if they sell sun-bleached grey siding anywhere...

Take care,

Troy

Friday, October 29, 2010

Give Me The Ol' Sculps Anyday...


Hey All.

    A fair bit of work on the Infantry tutorial yesterday - check it out on the Ritterkrieg site. If interest warrants (comment, and emails appreciated!) there will be a separate tut on face painting. I gotta say, I really love the old/mid production minis. They may have be fat bastards but they look great painted! I just cannot understand BF moving away from their quality that they established early on. I have tried the 'other' manufactures and they all came up short in one way or another. BF's early sculpts have action, accuracy, scale and faces! A joy to paint and display.

Although I may be able to put together a rag-tag (mix and match, body-part replacement, orgy of reconstruction) Company out of the BF old and new EW British sculpts, I will be ordering a pack of Forged in Battle soon to see if they fit the bill for my needs. Stay tuned...

To answer a few questions from the blog comments:

-I will be sending BF an email regarding the poor quality.
-The spent shells are heavy guage wire cut to length and white-glued down.
-Red Orchastra IS alive (and kicking)...Must resist the dark side...

...Mail came today, my IWATA HP-SB Plus is here! Can't wait to try it out today! Stay tuned...

Troy

Wednesday, October 27, 2010

Eight is enough...


Hey All.

Pictured above are some of the best sculpted figures from the EW British. Too bad they are all doing the same thing (ok the grenade thrower is not doing like everyone else but the pose is all wrong for tossing a grenade and he looks the same as the others). Believe it or not, these are all unique poses, some with only an adjusted leg or turned head.

I am a bit surprised I didn't get any hate mail from the previous post about the Battlefront stuff. I must admit, I wrote it in anger (and disappointment) but it needs to be said. BF has made and continues to make great figures (really love the details on their LW Russian and UK Infantry) but these EW figures are so bad that they seem like they are made by another company. I have been waiting sooooo long for early-war Brits and even went as far as buying up an overpriced OOP blister of the old sculpt on eBay. They are miles better than the new ones but still not that great.

Speaking of the old sculpts...


Above is a new sculpt with (left) with an old one (right). There are a quite a few of the new sculpt that dwarf the older figures. They are simply too huge to mix. Welcome to the spares box...

Pictured left is a little caddy I made up yesterday to hold all my Vallejo paints after finally having had enough of the searching for that damn hull red in all those browns! I found that at a 30 degree angle, the colors are much easier to find than in the foam tray they come in. As well, there was no way I could keep these bottles organized as they invariably ended up scattered all over the painting table.  

To make it, I took a 3/4" 12x30" piece of plywood and cut one edge at 30 degrees. I then cut 3 kerfs at 3.5" intervals and glued in 1/4 plywood strips that were 1 3/8" wide. I added edges and back supports and volia! Organization baby!

I am currently in the process of doing a paint swatch sheet up for reference and it was while doing that that I discovered how close that Yellow Green 881 and Dark Yellow 978 fit the bill for Russian Khaki uniform color. I had previously been using Khaki Grey but that was a bit too brown. Stay tuned...

Troy

Tuesday, October 26, 2010

WTF!


Hey All.

First off, let me say that I am not a fan-boy of any line of figures or have allegiance to any miniature company in any scale. I only promote what I believe is in gamers and painters best interest. I always give you my truthful thoughts and I refuse to BS you when there is something wrong. I also know that there will be the occasional figure that is miscast or is indeed a real dud. No problem if the rest are within a certain quality range.

The picture above is a sample of the quality (or lack thereof) of the new Battlefront EW figures.  In a word, they are shit. Total shit.

My excitement of receiving over 200 dollars worth (loosely using the work here folks) of figures turned to dismay and then to anger as I felt that I have truly been ripped off. I started by looking at the German figures. There were some OK figures but overall, they had the look of a rush job. Flash was heavy, faces miscast and Mausers looked like walking sticks. Hmmm...who mastered these?!

Then I opened the British...

WTF?!?

 What the hell are these? Bayonets look like flash, SMLE Rifles are too short, too thin and plainly not detailed at all. Poses are boring, and bizarre (so many figures waving bye-bye perhaps to BF's fan-base), scale is out of wack, flash atrocious, faces a joke, helmets look like Chinese farmers (maybe they sculpted these?!) finger prints on the castings of some figures, I could go on and on...I stopped looking after 2 bags.

These figures, for the most part, would require too much work to be brought to a so-so level. Heads need to be replaced, hands re-carved and heavy flash (the kind that erases detail) would need to be removed. Whats left is still a poor figure. Where did BF get these? Certainly not Evan Allen...

I will not buy any more BF figures unless they fix this. It is not up to their standards at all. What happened?!
I am considering a letter to BF...

I did have a bit of good news in the mail today - I am the proud new owner of 5 new Kolinsky Sable brushes (one winter harvest!!). Truly quality brushes at reasonable prices here:


They are a Canadian company so this may not be good for US readers but I am very happy with the service and quality.

Take care,

Troy 


Thursday, October 21, 2010

Russian Infantry Tutorial


Hey All.

Just a note to have a look at the new addition to my website dealing with a 15mm Infantry painting tutorial here:

http://www3.telus.net/Ritterkrieg/progress5.htm

I will be adding to it as I get more done.

Happy Painting!

Troy

Too Fat or Too thin.

Hey All.

All photos in this post are from BF website...

While excited and impatiently awaiting for the arrival of my broken down BF EW 15mm German and UK infantry from the EW Army sets...

Great idea for those with limited cash that only want certain 'new' items...ordered here: http://store.waterloominis.com/

...it seems that Battlefront has shifted away from the disproportionate big-headed, no neck, figures of early blisters, to a more realistic, but sometimes too skinny-headed soldiers. The old sculpts look great even compared to new ones and the slightly oversized everything is easier to paint. I think in some cases they may have gone too far toward Ethiopean stature.

Case in point, compare the 'old' Russian sculps...

 
...with 'new' Russian sculpts...
 
 
While there are a few really unusable figures, overall I think it is a step in the right direction. Facial detail has been increased slightly but made smaller so it may be harder to paint for some. I will let you know once I paint a few up.
 
The new UK Late War BR812 has it just about right, except for one Officer. His head was soooo skinny - it was laughable. The picture really doesnt do it justice, it was only about 2mm wide! I have since lopped it off and replaced it with a fatter one.


Your thoughts,
 
Troy

Monday, October 18, 2010

Bayonet details


Hey All.

A small post to supp. last nights. While painting up the first Russians, I noticed that the bayonets on the rifles really looked crappy. The Russians had a spiked bayonet for the Mosin Nagant and it looed nothing like the one modeled. So being the perfectionist I am, I tried paring it down and thats when I discovered why it was modelled that way - durability. The scale one I carved was simply too fragile to withstand any handling.

I overcame this with a painting trick. I painted black all of the bayonet and then added a thin metal highlight to the edge only. It gives the appearance of a spike with the rest being its shadow but is still strong enough to wargame with.

Happy Painting!

Troy

Sunday, October 17, 2010

Flat or Shiny, Part III


    First house Liberated in Europe by the Canadian forces, still standing although repaired. You can see where the holes on the gable end were filled and new wood added. BTW, the paint on the undamaged wood appears to be original! A kind of bronze green, it shows a lot of wear but is still in good shape!   

 
    Just a short post; late night at work. One final note on the flatcoat issue; to increase the durability of the PVA glue/Tamiya Flat Base overcoat, you can either add an undercoat of matt acrylic sealer or add 4 drops of Future Floor Polish (a flat acrylic would be better as this becomes less matt). Still looking for a good liquid matt acrylic sealer...

Troy

Friday, October 15, 2010

Flat or Shiny, Part II

First off, can anyone identify this tower? It is located in the Calvados region of France, just off the road, in a field, 1km West of Bazenville. Its about 100m away from the Ryes War cemetery. I found a Canadian Soldiers boot heel in the dirt near its entrance and discovered lots of 1944 names/dates etchings on the walls inside from various soldiers, German and Canadian as well as a few really old ones. I have some pictures from the inside as well. I think it may have been a windmill. Anyone?

Next, I'm happy to say that after much messing about I think I may have come up with a less toxic solution to final flatcoating miniatures. I will begin by telling you what didn't work...


Testors Dulcote #1260: As said previously, when it works, this is the shit. Dead flat, doesn't obscure detail too much even with a few coats. Too bad it will probably kill you. Next!

Various Commercial Acrylic Matt Varnishes: Various names and brands. Think Wallmart and craft stores. Mostly these are crap. They are not at all flat, most are in the eggshell range with some actually semi-gloss. Pass...

Vallejo Matt Varnish #520: This stuff doesn't say Non-toxic on the label but has no bad odor or warning labels on it so gets the 1/2 nod from me. The finish is pretty flat, and it doesn't obscure the details as much as many other methods but it isn't dead flat (as Dulcote can be). Think of it as a semi-flat. Only apply this after paint has dried for a few days or it will be more of a eggshell (dunno why). Price is a factor as the 17ml bottle costs upwards of four bucks. I will use it only if there is nothing better...

Tamiya Flat Base # X21: By itself this is not a flatcote but instead an additive to acrylic paints to flatten them.

X21 mixed  with Vallejo Flatin a 1 to 4 ratio: No noticable difference. Adding more flat base seems  to do nothing then POW!, ruined frozen looking mini. Pass...

X21 mixed with Future Floor Polish in a 1 to 4 ratio: Nope...still shiny. Adding more flat base creates a frozen looking mini that it still shiny on outer faces. Pass...

...and the winner is...

X21 mixed with Plain white Glue and tap water in a 1 to 1 to 4 ratio: This seems to do the trick.  Absolutley DEAD flat finish but make sure to not add too much flat base!  Less may work well too - I have not tested this yet. Heres why I think this works. The white glue holds the flat base pigment in place and prevents it from pooling in the folds and depths of figures and vehicles (like the future polish). This is a cheap and easy solution with a single drawback. If you soak the mini in water or it gets wet, it may come off.

Happy Painting!

Troy

Wild Poppies

My lovely (and bored) wife and I at the Longues-sur-Mer battery, Normandy this August. A great stop if you are there, as this is the only bunker complex we visited that still had their guns (15.2cm Krupp L/45 naval guns). One of the four guns is completely destroyed, as well as another that is battle damaged; taken out by Naval gunfire resulting in about 60 casualties.

Cheers!

Troy

Wednesday, October 13, 2010

Flat or Shiny, Part I


Got kicked in the nuts today by a can of Testors Dulcote. Normally this my staple final FLATspray. Seems that this particular can is more semigloss...It worked ok with a few other minis...Getting a bit pissed with dulcote. It works great when it works. But when it doesn't...Used the Dulcote on the SPW 251 after decals, weathering, and a few small details. Picture above is pre-dulcote.

Tried out some Doms Decals and let me say they are a great product. Sharp and perfect size for 15mm. Used the license plates and Balkenkreutz ones and was really impressed.

Still going to add the rear AA MG and a front sMG with a gunner.  Currently track is in the oven to cure and see if the Dulcote will flatten a bit. Stay tuned...

Built a mold out of FIMO for German helmets. Tired of lopping off the heads of unsed minis for crew helmets. Really wish someone would do a helmet pack.

Looked at a couple Batlefront package deals today. Man are they expensive! There is a 5-pack of Jagpanthers: $85.00 before shipping and customs...oh well, Ive got enough to keep me busy for now.

Troy

Today in History...


Todays topic...German WWI gravesites near the Marne. This cemetery was located, ajoining a British one, each on opposite sides of the same hill. Buried in the German side were many German Jews and Gentiles, side by side. Seems Hitler and his gang conveniently forgot that Jews shed the blood of their sons on the battlefields of WWI in the service of the Fatherland... the same as other Germans...sad...

Periodically, I will be adding some photos of my recent trip to Europe such as the one above...mostly when I'm too damn tired to take a pic of my recent work!
Tomorrow, looking forward to finishing and decalling the 251 as well as the remaining 3 x Panzer IVF1s  (of 5) that I have also been working on. They will be a part of the German Stalingrad-era army I am working on. (24th Panzer). Should be a good day!
Troy

Saturday, October 9, 2010

Filtering

Hey All.

Worked last night untill 3:00 am and got up late to work on the SPW 251. Playing around with a technique that is unique (I think) to Vallejo Paints. I discovered this while attempting to tone down an overlightened vehicle a few months back. Basically its the ability to use Vallejo paints in a wash that is somewhere in the 100 to 1 ratio (or more) water to paint. Using a wash such as this allows subtle tone transitions and 'filtering' of the underlying basecoat. Used this technique on the 251 pictures below (did I mention the bundle is bitchin'?):

MiG Pigments makes a filter too but why buy when you can use what you already have?!  Spent the day painting and am really beginning to get the hang of the Vallejo line.

Troy

Thursday, October 7, 2010

A real day off...

As the title suggests, today was a real day to do whatever the hell I wanted. Paint was high on the agenda. Didn't get too much painted though...  Finished the faces of two Russians (toughtest, most time consuming part of the mini IMHO) and glued 'em down.

What a dramatic difference in face quality in the same line/blister. The DP-27 gunner has a great mug. The riflemen looks pretty ogre-ish! Still spent a considerable amount of time on the faces.


Also played around with color choices. The Helmet gave me the most trouble. Started with Russian Green 894 and added yellow and khaki until happy. Base coated with this and washed with original Russian Green and plain water. Drybrushed with yellow/green. Finally added a bit of rust/dirt and coated with a semi-gloss to replicate pictures of actual helmets. Didn't seem that the helmets were really flat. Dullcote will tone this down a bit.

Planning to attend Salute 2011 in Vancouver in March and host a couple games using BF 15mms and Schwere Kompanie rules. Thinking about doing East Front - Stalingrad. Should be an enormous amount of terrain to construct...

 As a side note, added some extra detailing to a German (s)MG-34 base. Spent brass and FIMO ammo cans with a spare barrel case and barrel. Not too sure about the large amount of shells - human wave?!

Almost forgot to mention, got the Flames of War Battle Foam mini storage case in the mail today. $100.00 well spent... er...i guess...actually its a pretty high quality item. Perfect storage for 15mm goodies and the like - just a wee bit pricey! A bit of decadence I guess.

Troy

Four Russians soldiers crossed the Rhine, Taboo...Taboo...


Worked on my first of many Russian Soldiers last night. Turned out very  good - no wash, all brushwork. Took me about 2 hours...better than the last bunch but still...bidding on some new Kolinsky Sable brushes...dollar store shit is not cutting it anymore. I think I may have too much money. Not caring about the price. Ahhh...middle age!

Tried out the Vallejo Khaki Grey 880 on the minis. Pretty happy with the color. Used Buff and Dark camo Brown to highlight and shade. May go back to White and Black. Thinking about using Vallejo washes. Had to research the uniform color and webbing. Impressed with the poses and sculpt. A little blocky and stout (too much Borscht?) but easy to paint.

Assembled and primed a Sd.Kfz. 251 Ausf C halftrack and scratchbuilt an undiching bundle and rear tarp.  Should be painting it up tomorrow morning. Bundle looks bitchin'!

Pic above added from my recent trip to Europe. Tanks, cemeteries, churches and bunkers!! Trip of a lifetime (for me - poor wife, to her they all look the same).

Tuesday, October 5, 2010

Taking the plunge!


Well hello there!


 My first post to the new blog...

  I have been wanting to start one of these for awhile now to suppliment the Ritterkrieg website, mostly to add an easily updated forum for me to jot my thoughts down for anyone interested in my painting techniques and a place to ramble about gaming and life in general.


 I have just now finished up (well almost) a FOW (Flames of War) Battlefront (BF) German Grenadier Kompanie...only took a year or so...Really gonna have to play less Red Orchastra and focus more on painting.

I think I may be aiming a bit too high with my painting style with the BF minis in that the detail is great for gaming but is lacking for the amount of time I am putting in...did that make any sense?! What I mean is, am I spending too much time per figure? Im gonna try out a faster technique with the next figures - Russian early-war Infantry. Started them today. Four at a time. Also going to start a vehicle with every group of figures to work on while waiting for paint to dry or when I get bored...

Troy