Hey All!
DISCLAIMER! The following blog entry borders on the ridiculous. The picture below is of fairly unmodified MG teams - these would work for most people. Myself...well, I am a bit of a stickler for details. To that end, I have decided to put a significant amount of time (that I'm sure could be better spent finishing other projects), into modifying my German MG teams. Also, dont get the wrong message, I am not anti-Battlefront. They do a fairly good job of making gaming miniatures - not scale models, and this is OK but for me, there is always room for improvement.
A few months back I was playing Schwere Kompanie with my buddy John and noticed he based his MG teams on a small FOW base instead of a medium. I really liked this idea as it fit the theme of a small base having a single casualty point and a medium base having two. Also, it reduced the overall footprint and helped lessen the 'parking-lot' syndrome of 15mm games.
Originally, I decided to use the medium base as the three-man teams plus MG were crowded on the small base but after deciding to reduce MMG teams to two figures, this is no longer a problem. HMG teams will forthwith consist of three-man teams on a (somewhat) crowded base.
I began collecting the appropriate minis. Battlefront makes a basic somewhat simplified (but robust) MG34 and MG42 on the Lafette mount. In my opinion, it is the best one out there for 15mm in metal. You could use as is but there are some real quality control issues with the latest products...
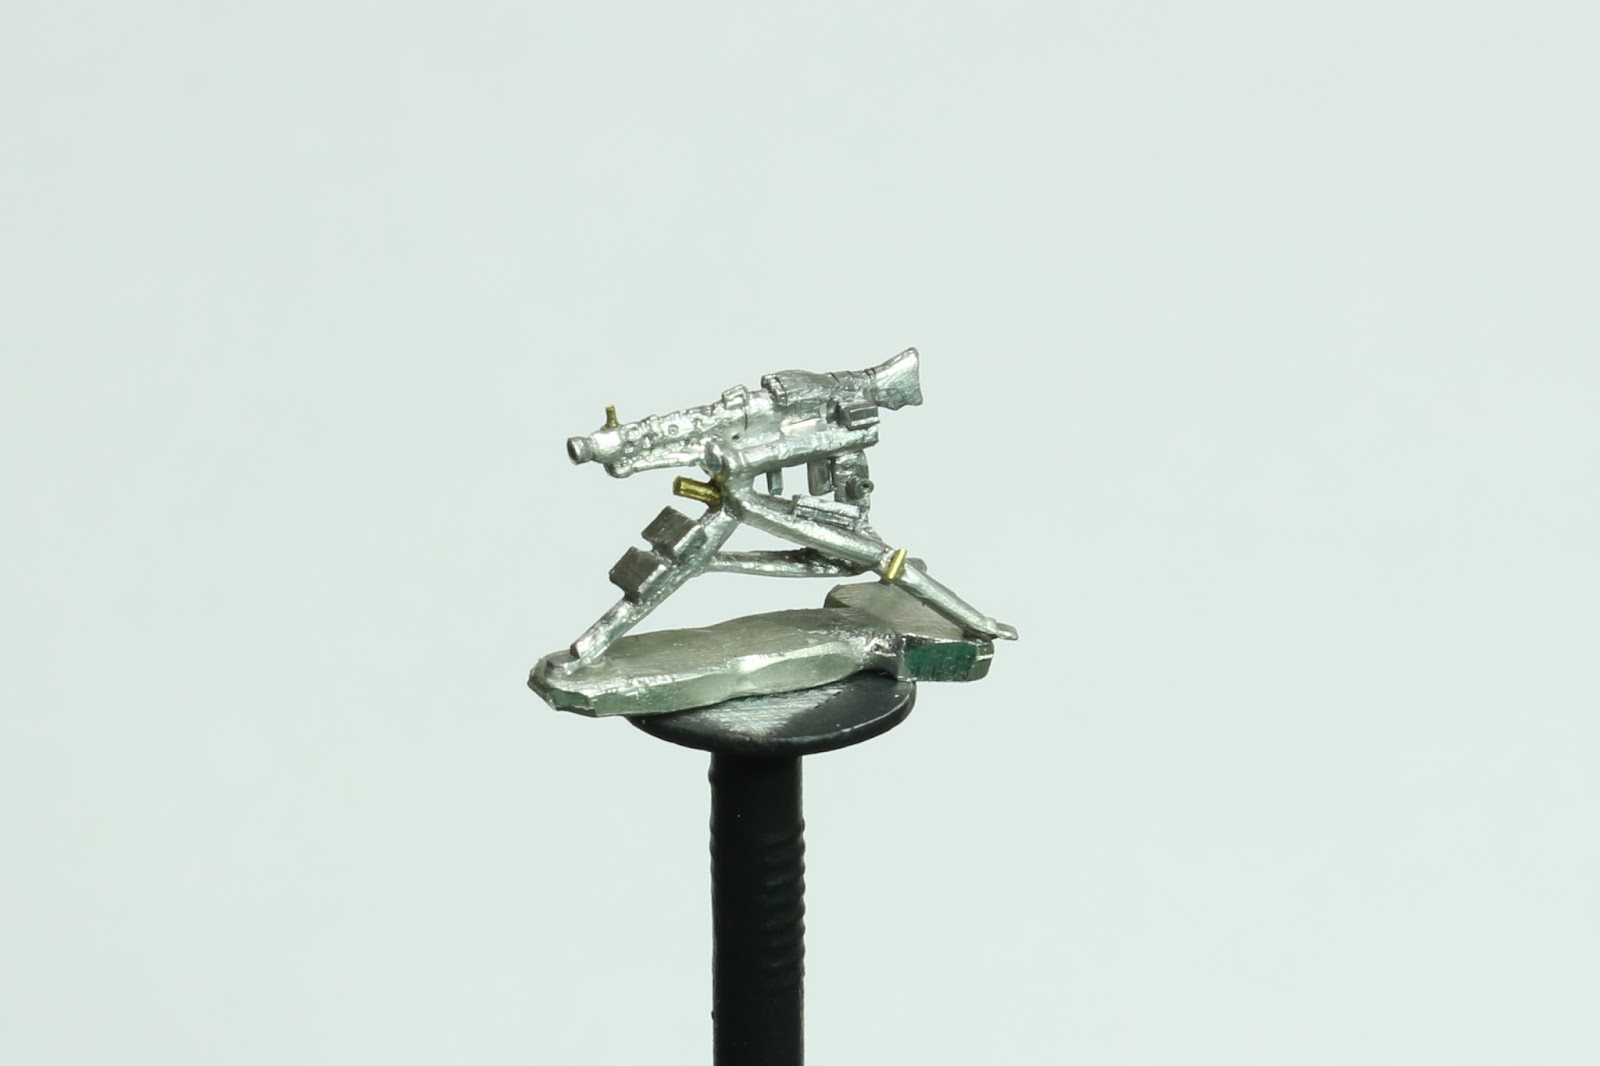
Lafette für schwere Maschinengewehre MG34: There are two offerings from BF; the one-piece, deployed version without telescope sight and the two-piece collapsed version with sight. I decided to try to re-work the BF deployed mount and scratch-build one with the two-piece mount to see which was easier to do and whether it was worth the effort.

On the one-piece model, I began by removing the base as there was so much extra material and flash on the legs. This took a fair amount of time. I shaved the legs down to a more round shape and smoothed out some rough spots. I added foot pads to the legs by pinching the ends with needle-nose and reshaping with an x-acto. I reworked the incorrect recoil housing that the MG rests on - it should be angled instead of round. I removed the molded on carrying pads off the front leg and replaced. I angled the rear legs to define the joint where the wing-nut fastener is on the real model and added a small circle and nut. I re-scribed all the detail particularly the vent holes in the barrel and added in some that was missing.

I added a front sight, a new flash-suppressor as the molded on one was out of round, a cocking handle and a tool box. I added the missing AA-mount and telescope sight attachment points. I re-worked the elevation and pan mechanism adding in a elevation knob and gear tube. I neglected to add the firing handle as this would be in the gunners hand and would get in the way when adding. Finally, added a spent link belt - the live belt will be mounted on the assistant gunner.
For the scratch-built two-piece, I painted up a non-modified version for comparison.
The crew had significant re-working in order to actually serve the weapon - new arms and hands as well as heads. These are the same figure with modifications. Taken from BFs EW/MW mortar crew.
I did add a spent/live belt made from sheet metal and painted to represent links and shells..
The prone crew just fit on the base; crouching figures will fit a bit better.
Not really happy with the folded tripod - too many simplifications and errors in the look - as well, there is a significant problem in the recoil mechanism that the gun rests on (red arrow). One side is longer by a 1/16th inch on both ends and requires a fair bit of reworking. This is difficult as the folded tripod legs are also longer on one side and shortening the longer side cuts into the telescopic sight mounting point. The MG itself which is cast as the same piece is not as badly miss-aligned so this is probably an issue with the master mold.
After fixing this as best I could, I scratch-built the tripod using 22-gauge brass wire, soldered together. The front leg and AA-mount are one piece and the cradle and rear legs are a separate part. I made some changes to the telescopic sight as is really is a poor representation of the real thing.

I reworked the MG in a similar fashion as the one-piece and still have to add the wing-nuts and such but time spent scratch building the mount were significantly less than re-working the original.
I think the two are comparable but I think I will be going the scratch building path as it does save time.
Lafette für schwere Maschinengewehre MG42: Similar treatment to the MG34.
 I have primed this mini to check for missed crud and flash...
I may add leather pack slings to the tripod.

As for basing, I will try to add a third crewman to distinguish between the sMG34 and sMG42 teams. The figure below is one of two early war figures included in the Battlefront German Heavy MG blister. He does require a fair bit of reworking of arm and hand to properly grip the firing handle but is probably the best one they make. I have a few other figures I will be converting as gunners to add variation to the teams.

Worked on the folded version of the tripod with a MG42...
Magnification needed...
Reworked the telescopic sight. Re-carved and added a few brass/solder parts
1/6th scale MG42 for size reference...
Just need a couple prone crewmen...
Cheers!
Troy