Hey All!
PART I
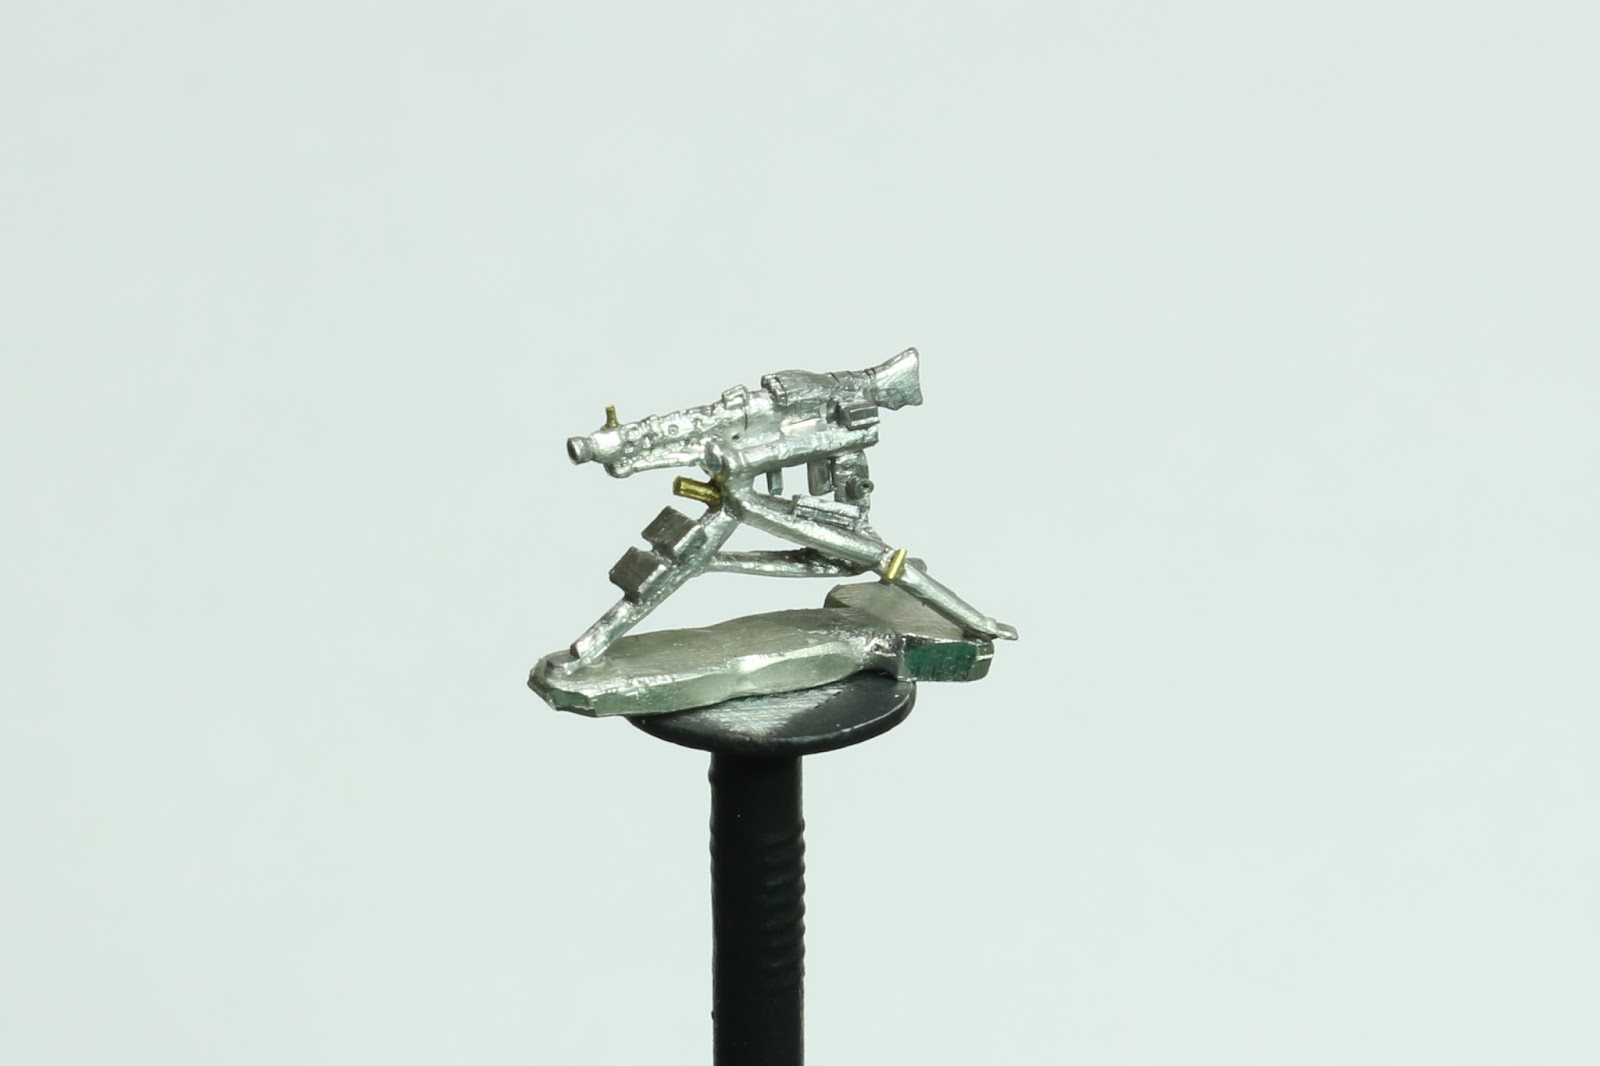
Just a small post - on a missing product in 15mm, the Soviet SG-43 Goryunov HMG.
In preparation for Salute 2017 in Vancouver, I realized I will need two SG-43 MMGs teams for the Schwere Kompanie 'Lost Panzers' scenario I am planning to host.
As pointed out on the BF forum, the mini is available in the Flames Of War Vietnam product line as the Type 57 HMG though it is missing the shield, has the wrong crew and carriage. I'm guessing you could head swap the crew and modify the uniform but I wanted to see if I could make something passable - and spending 50 bucks for 3 MGs is out of my budget!
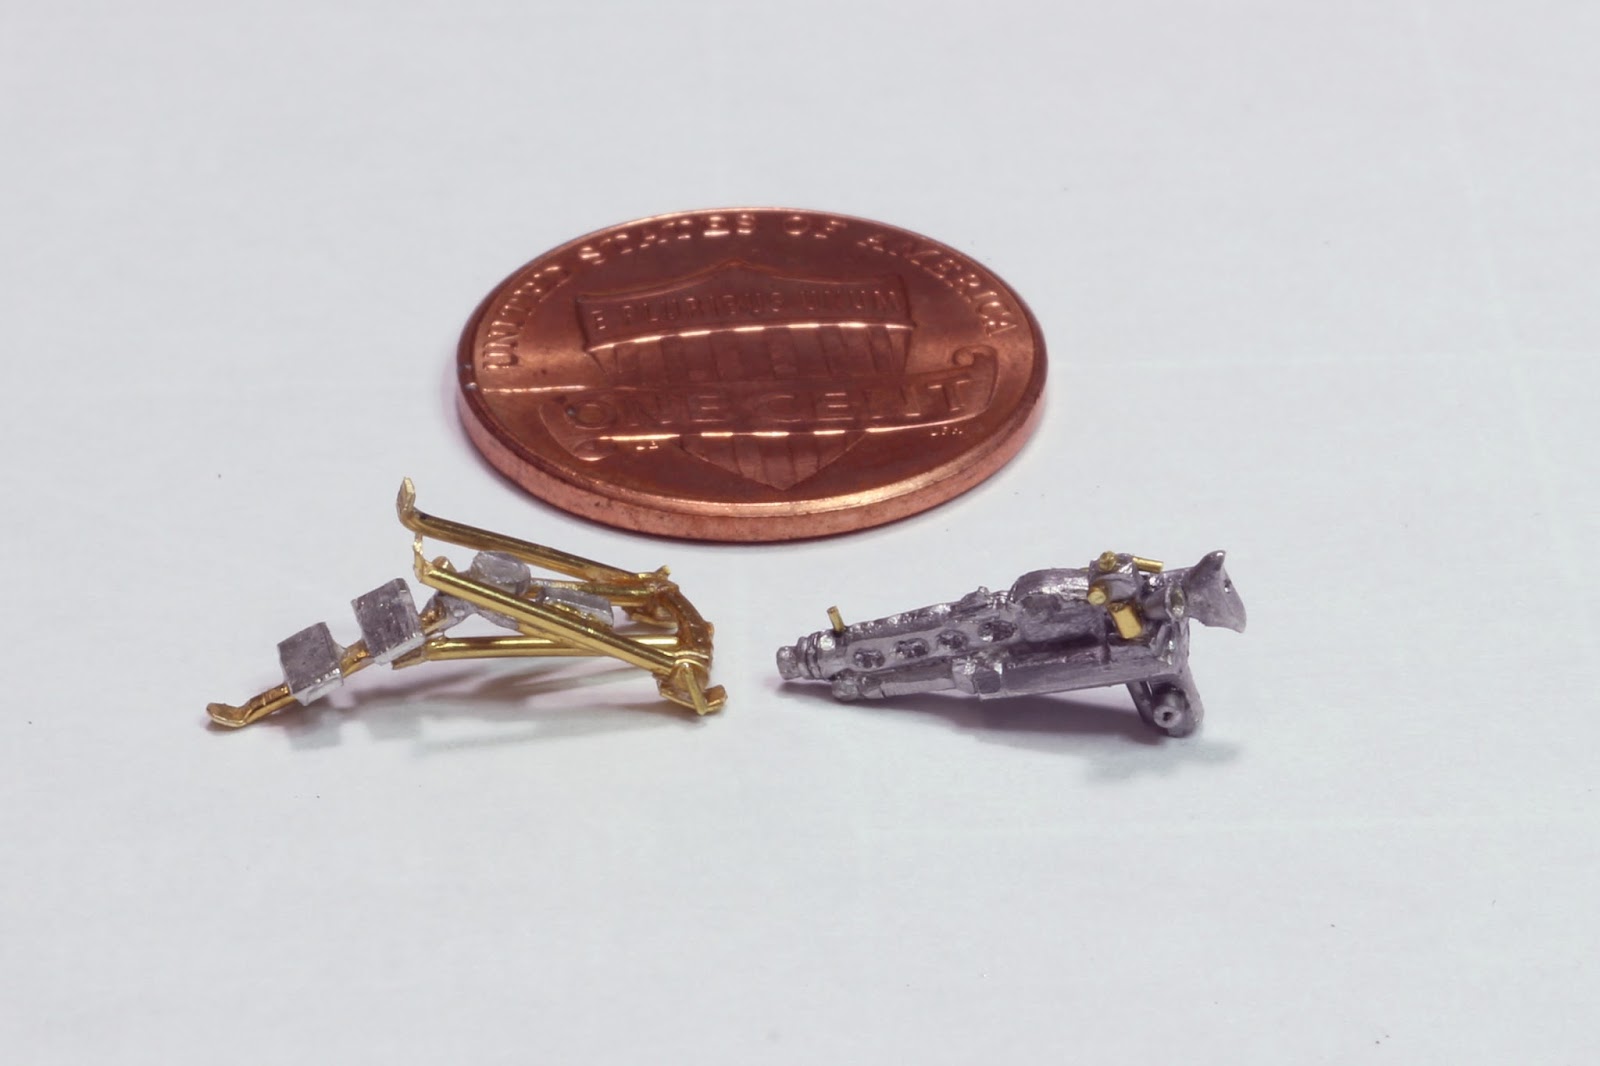
I turned the barrel on the dremel and built the body from plastic.
Crew taken from the AA DsHK 1938 (modified) and midwar Maxim HMG blisters.
Little bits made from brass sheet...
PART II
Cheers!
Troy
Thursday, January 26, 2017
Thursday, January 19, 2017
Life in Plastic...
Hey All!

Over the Christmas season, I ordered a bunch of new(er) Battlefront plastic boxed sets from Imperial Hobbies in Burnaby and Sentry Box in Calgary. Both are great Hobby stores and are highly recommended.
Sadly, the Panzer IVH Platoon GBX79 I ordered was an older box with the incorrect 8-spoke rear idler wheel and 4-panel Schürzen. This has since been changed but it must have been old stock. I fired an email off to Battlefront, who are sending out the correct Schürzen panels taken from the OOP older resin GBX79. I got mine in record time - kudos to BF Customer service! Too bad design and research aren't as good!
Unfortunately I could not get the panels to work with either the old or new mounting rails as the triangle spikes do not line up with the panels (2 per panel). So I removed the mounting supports and covered over the scars with zimmerit done with a soldering iron.
This is a great improvement over the previous resin offering from Battlefront. That said, there are a few minor tweaks you can make. The turret cupola is too high. Sand off the cupola mounting peg and a bit off the bottom to bring it more into scale. The main gun mantlet fit is poor and will need some filler. Also you can add zimmerit on the sides and shield.
Dents added to the rear and side mufflers. Bolts added to back of turret Schürzen. A cut was made in between the spare road wheels on the fender.
I added zimmerit to the fenders and sides of the hull. Also added a locking pin to the front fenders and tow point. The hull MG was sanded down to recess it into the hull (it sticks out too far).
I also built up one of the new Battlefront Tiger I tanks. This is one Great kit!
My only fix is when mounting the tracks, you have to add a temporary small spacer strip of 1/8" plastic on the rear end of track when attaching to the hull to space it or they will sit too low.
Some zim was removed and a pin added to replace the flimsy hull MG.
And finally, I took a Sd.Kfz. 251/1 Ausf D and made a 251/9 out of it.
Lots of changes and extras added. New floor, bench removal, new 7.5cm gun and mount, and sMG 42 mount scratchbuilt.
Cheers!
Troy
Lots of projects in
the pipe…I finished painting up
the sMG42 team...
Sadly, the Panzer IVH Platoon GBX79 I ordered was an older box with the incorrect 8-spoke rear idler wheel and 4-panel Schürzen. This has since been changed but it must have been old stock. I fired an email off to Battlefront, who are sending out the correct Schürzen panels taken from the OOP older resin GBX79. I got mine in record time - kudos to BF Customer service! Too bad design and research aren't as good!
Unfortunately I could not get the panels to work with either the old or new mounting rails as the triangle spikes do not line up with the panels (2 per panel). So I removed the mounting supports and covered over the scars with zimmerit done with a soldering iron.
This is a great improvement over the previous resin offering from Battlefront. That said, there are a few minor tweaks you can make. The turret cupola is too high. Sand off the cupola mounting peg and a bit off the bottom to bring it more into scale. The main gun mantlet fit is poor and will need some filler. Also you can add zimmerit on the sides and shield.
Cheers!
Troy
Monday, December 19, 2016
Christmas Wrap
Merry Christmas All!
Just working on a few more figures for my sMG teams...

I changed up my Recommended Color for German Kar98 strap to Orange Brown 981- the one in my collection is a more of a red-brown leather color. I was using Saddle Brown 940 but there isn't enough contrast.

I also have moved back to Olive Grey 888 for ammo cans/spare barrel cases and the like.
All the best to everyone out there - somehow Peace in the new year...
Just working on a few more figures for my sMG teams...
I changed up my Recommended Color for German Kar98 strap to Orange Brown 981- the one in my collection is a more of a red-brown leather color. I was using Saddle Brown 940 but there isn't enough contrast.
I also have moved back to Olive Grey 888 for ammo cans/spare barrel cases and the like.
All the best to everyone out there - somehow Peace in the new year...
Tuesday, October 25, 2016
Threes a Crowd! (or Itty-Bitty MGs Part II)
Hey All!
Ok Ritter, whats this? Un-painted figures?
Just a progress pictorial of the MG teams on the bench. Re-worked a trio of figures to base up the sMG42 team...
As far as figures are concerned, the detail, durably and re-workability of metal figures keeps me from jumping on the plastic bandwagon. From what I've seen, plastics just don't have the strength. Sure you could still smash metal minis flat with a hammer but that shouldn't happen ...unless you REALLY piss off the wife!
A fair bit of time went into these crewmen. They all received the standard cleaning up of flash and re-scribing of straps and such. All face detail and helmets gets the once over to fix any detail glitches.
As I didn't want to cover up the MG detail, the gunner had his right arm straightened (with a soldering iron) and hand re-carved to hold an ammo can instead of gripping the firing mechanism.
The Officer had a fair bit of tunic removed under his left arm - it was far too thick.
I like to take time posing up figures to get the right look and add interest and interaction between the minis. Also I try to keep fiddly bits protected. The standing figure should help keep the MG safe.
I usually sand down the bases of figures to ease hiding them. I usually do this over the trash - BF's figures do contain lead...
The Standing figure had his ammo can replaced with a more to scale (tho slightly over-scaled) ammo can. His weapon, the Kar-98, was detailed and re-scribed. The strap on his Kar-98 was attached to the lower bottom of the stock. This is incorrect and so was re-carved to attach to the side. A buckle was added to the other side made out of soft brass. Finally a missing bolt action was added from brass wire.
Painted Pics!
sMG-42 Teams - Three men per base...
sMG-34 Teams, Two men per base...
Cheers!
Troy
Ok Ritter, whats this? Un-painted figures?
Just a progress pictorial of the MG teams on the bench. Re-worked a trio of figures to base up the sMG42 team...
As far as figures are concerned, the detail, durably and re-workability of metal figures keeps me from jumping on the plastic bandwagon. From what I've seen, plastics just don't have the strength. Sure you could still smash metal minis flat with a hammer but that shouldn't happen ...unless you REALLY piss off the wife!
A fair bit of time went into these crewmen. They all received the standard cleaning up of flash and re-scribing of straps and such. All face detail and helmets gets the once over to fix any detail glitches.
As I didn't want to cover up the MG detail, the gunner had his right arm straightened (with a soldering iron) and hand re-carved to hold an ammo can instead of gripping the firing mechanism.
The Officer had a fair bit of tunic removed under his left arm - it was far too thick.
I like to take time posing up figures to get the right look and add interest and interaction between the minis. Also I try to keep fiddly bits protected. The standing figure should help keep the MG safe.
I usually sand down the bases of figures to ease hiding them. I usually do this over the trash - BF's figures do contain lead...
The Standing figure had his ammo can replaced with a more to scale (tho slightly over-scaled) ammo can. His weapon, the Kar-98, was detailed and re-scribed. The strap on his Kar-98 was attached to the lower bottom of the stock. This is incorrect and so was re-carved to attach to the side. A buckle was added to the other side made out of soft brass. Finally a missing bolt action was added from brass wire.
Painted Pics!
sMG-42 Teams - Three men per base...
Cheers!
Troy
Friday, October 21, 2016
Itty-Bitty MGs!
Hey All!
DISCLAIMER! The following blog entry borders on the ridiculous. The picture below is of fairly unmodified MG teams - these would work for most people. Myself...well, I am a bit of a stickler for details. To that end, I have decided to put a significant amount of time (that I'm sure could be better spent finishing other projects), into modifying my German MG teams. Also, dont get the wrong message, I am not anti-Battlefront. They do a fairly good job of making gaming miniatures - not scale models, and this is OK but for me, there is always room for improvement.
A few months back I was playing Schwere Kompanie with my buddy John and noticed he based his MG teams on a small FOW base instead of a medium. I really liked this idea as it fit the theme of a small base having a single casualty point and a medium base having two. Also, it reduced the overall footprint and helped lessen the 'parking-lot' syndrome of 15mm games.
Originally, I decided to use the medium base as the three-man teams plus MG were crowded on the small base but after deciding to reduce MMG teams to two figures, this is no longer a problem. HMG teams will forthwith consist of three-man teams on a (somewhat) crowded base.
I began collecting the appropriate minis. Battlefront makes a basic somewhat simplified (but robust) MG34 and MG42 on the Lafette mount. In my opinion, it is the best one out there for 15mm in metal. You could use as is but there are some real quality control issues with the latest products...
Lafette für schwere Maschinengewehre MG34: There are two offerings from BF; the one-piece, deployed version without telescope sight and the two-piece collapsed version with sight. I decided to try to re-work the BF deployed mount and scratch-build one with the two-piece mount to see which was easier to do and whether it was worth the effort.

On the one-piece model, I began by removing the base as there was so much extra material and flash on the legs. This took a fair amount of time. I shaved the legs down to a more round shape and smoothed out some rough spots. I added foot pads to the legs by pinching the ends with needle-nose and reshaping with an x-acto. I reworked the incorrect recoil housing that the MG rests on - it should be angled instead of round. I removed the molded on carrying pads off the front leg and replaced. I angled the rear legs to define the joint where the wing-nut fastener is on the real model and added a small circle and nut. I re-scribed all the detail particularly the vent holes in the barrel and added in some that was missing.
I added a front sight, a new flash-suppressor as the molded on one was out of round, a cocking handle and a tool box. I added the missing AA-mount and telescope sight attachment points. I re-worked the elevation and pan mechanism adding in a elevation knob and gear tube. I neglected to add the firing handle as this would be in the gunners hand and would get in the way when adding. Finally, added a spent link belt - the live belt will be mounted on the assistant gunner.
For the scratch-built two-piece, I painted up a non-modified version for comparison.
The crew had significant re-working in order to actually serve the weapon - new arms and hands as well as heads. These are the same figure with modifications. Taken from BFs EW/MW mortar crew.
I did add a spent/live belt made from sheet metal and painted to represent links and shells..
The prone crew just fit on the base; crouching figures will fit a bit better.
Not really happy with the folded tripod - too many simplifications and errors in the look - as well, there is a significant problem in the recoil mechanism that the gun rests on (red arrow). One side is longer by a 1/16th inch on both ends and requires a fair bit of reworking. This is difficult as the folded tripod legs are also longer on one side and shortening the longer side cuts into the telescopic sight mounting point. The MG itself which is cast as the same piece is not as badly miss-aligned so this is probably an issue with the master mold.
After fixing this as best I could, I scratch-built the tripod using 22-gauge brass wire, soldered together. The front leg and AA-mount are one piece and the cradle and rear legs are a separate part. I made some changes to the telescopic sight as is really is a poor representation of the real thing.
I reworked the MG in a similar fashion as the one-piece and still have to add the wing-nuts and such but time spent scratch building the mount were significantly less than re-working the original.
I think the two are comparable but I think I will be going the scratch building path as it does save time.
Lafette für schwere Maschinengewehre MG42: Similar treatment to the MG34.

I have primed this mini to check for missed crud and flash...
I may add leather pack slings to the tripod.
As for basing, I will try to add a third crewman to distinguish between the sMG34 and sMG42 teams. The figure below is one of two early war figures included in the Battlefront German Heavy MG blister. He does require a fair bit of reworking of arm and hand to properly grip the firing handle but is probably the best one they make. I have a few other figures I will be converting as gunners to add variation to the teams.

Reworked the telescopic sight. Re-carved and added a few brass/solder parts
1/6th scale MG42 for size reference...
Just need a couple prone crewmen...
Cheers!
Troy
DISCLAIMER! The following blog entry borders on the ridiculous. The picture below is of fairly unmodified MG teams - these would work for most people. Myself...well, I am a bit of a stickler for details. To that end, I have decided to put a significant amount of time (that I'm sure could be better spent finishing other projects), into modifying my German MG teams. Also, dont get the wrong message, I am not anti-Battlefront. They do a fairly good job of making gaming miniatures - not scale models, and this is OK but for me, there is always room for improvement.
A few months back I was playing Schwere Kompanie with my buddy John and noticed he based his MG teams on a small FOW base instead of a medium. I really liked this idea as it fit the theme of a small base having a single casualty point and a medium base having two. Also, it reduced the overall footprint and helped lessen the 'parking-lot' syndrome of 15mm games.
Originally, I decided to use the medium base as the three-man teams plus MG were crowded on the small base but after deciding to reduce MMG teams to two figures, this is no longer a problem. HMG teams will forthwith consist of three-man teams on a (somewhat) crowded base.
I began collecting the appropriate minis. Battlefront makes a basic somewhat simplified (but robust) MG34 and MG42 on the Lafette mount. In my opinion, it is the best one out there for 15mm in metal. You could use as is but there are some real quality control issues with the latest products...
Lafette für schwere Maschinengewehre MG34: There are two offerings from BF; the one-piece, deployed version without telescope sight and the two-piece collapsed version with sight. I decided to try to re-work the BF deployed mount and scratch-build one with the two-piece mount to see which was easier to do and whether it was worth the effort.
On the one-piece model, I began by removing the base as there was so much extra material and flash on the legs. This took a fair amount of time. I shaved the legs down to a more round shape and smoothed out some rough spots. I added foot pads to the legs by pinching the ends with needle-nose and reshaping with an x-acto. I reworked the incorrect recoil housing that the MG rests on - it should be angled instead of round. I removed the molded on carrying pads off the front leg and replaced. I angled the rear legs to define the joint where the wing-nut fastener is on the real model and added a small circle and nut. I re-scribed all the detail particularly the vent holes in the barrel and added in some that was missing.
I added a front sight, a new flash-suppressor as the molded on one was out of round, a cocking handle and a tool box. I added the missing AA-mount and telescope sight attachment points. I re-worked the elevation and pan mechanism adding in a elevation knob and gear tube. I neglected to add the firing handle as this would be in the gunners hand and would get in the way when adding. Finally, added a spent link belt - the live belt will be mounted on the assistant gunner.
For the scratch-built two-piece, I painted up a non-modified version for comparison.
The crew had significant re-working in order to actually serve the weapon - new arms and hands as well as heads. These are the same figure with modifications. Taken from BFs EW/MW mortar crew.
I did add a spent/live belt made from sheet metal and painted to represent links and shells..
The prone crew just fit on the base; crouching figures will fit a bit better.
Not really happy with the folded tripod - too many simplifications and errors in the look - as well, there is a significant problem in the recoil mechanism that the gun rests on (red arrow). One side is longer by a 1/16th inch on both ends and requires a fair bit of reworking. This is difficult as the folded tripod legs are also longer on one side and shortening the longer side cuts into the telescopic sight mounting point. The MG itself which is cast as the same piece is not as badly miss-aligned so this is probably an issue with the master mold.
After fixing this as best I could, I scratch-built the tripod using 22-gauge brass wire, soldered together. The front leg and AA-mount are one piece and the cradle and rear legs are a separate part. I made some changes to the telescopic sight as is really is a poor representation of the real thing.
I think the two are comparable but I think I will be going the scratch building path as it does save time.
Lafette für schwere Maschinengewehre MG42: Similar treatment to the MG34.
I have primed this mini to check for missed crud and flash...
I may add leather pack slings to the tripod.
Worked on the folded version of the tripod with a MG42...
Magnification needed...Reworked the telescopic sight. Re-carved and added a few brass/solder parts
1/6th scale MG42 for size reference...
Just need a couple prone crewmen...
Cheers!
Troy
Subscribe to:
Posts (Atom)