Sunday, July 27, 2014

Sturm-Infanteriegeschutz 33B and PSC

Hey All!

In the continuing saga of everything Stalingrad, I have begun work on another period vehicle - the StuIG33B. This vehicle saw combat in November in Stalingrad with the Sturmgeschütz-Abteilung 177 and Sturmgeschütz-Abteilung 244 and also in the with the Sturmgeschütz-Abteilung 243 and 245 in the attempt to relieve the trapped 6th Armee. I am used Battlefronts GE133 blister for this project and all in all its a pretty good model with a few flaws.

The Battlefront kit has the usual issues with simplification and rough road wheels as well as a few. inaccuracies.

No extra road wheels (or much of anything) are included in the kit so I have added a few items seen in photos and was pleased to note that extra road wheels and track from Plastic Soldier Companies new Panzer III boxed set fit the bill perfectly! These items look great and are only slightly smaller than BF extra road wheels/tracks but the detail is no contest! This boxed set is really a must-have for fans of the PzIII and I cannot wait to put these together! I will spotlight the build in a future blog entry.
One other problem with the BF kit is the hole along the bottom of the superstructure sides to accommodate the fender supports that are present on the metal track part. It seems Battlefront simply used the tracks from the StuG kits for the StuIG33. This results in there being fender supports where there should be none and tools being in the wrong position. (jack on wrong side, no axe/wire cutters, track pry bar should not be where it is etc). As well the track pieces sit too low and should mate up tight with the hull. Picture below from Battlefronts site:
I removed the fender supports, ground down the hull so it fit flush and filled the holes with JB Weld. I also added back a couple fender supports where they belonged, an MG34, and a headlight.
I will add a fender stowage box, a tow cable and maybe a few roadwheels on the superstructure front although I am not too sure this was done in Stalingrad?!

Card above for vehicle for Schwere Kompanie rules.

PS: Did a bit more work on the StuIG. Moved the jack, added an axe, stowage box and fire extinguisher.

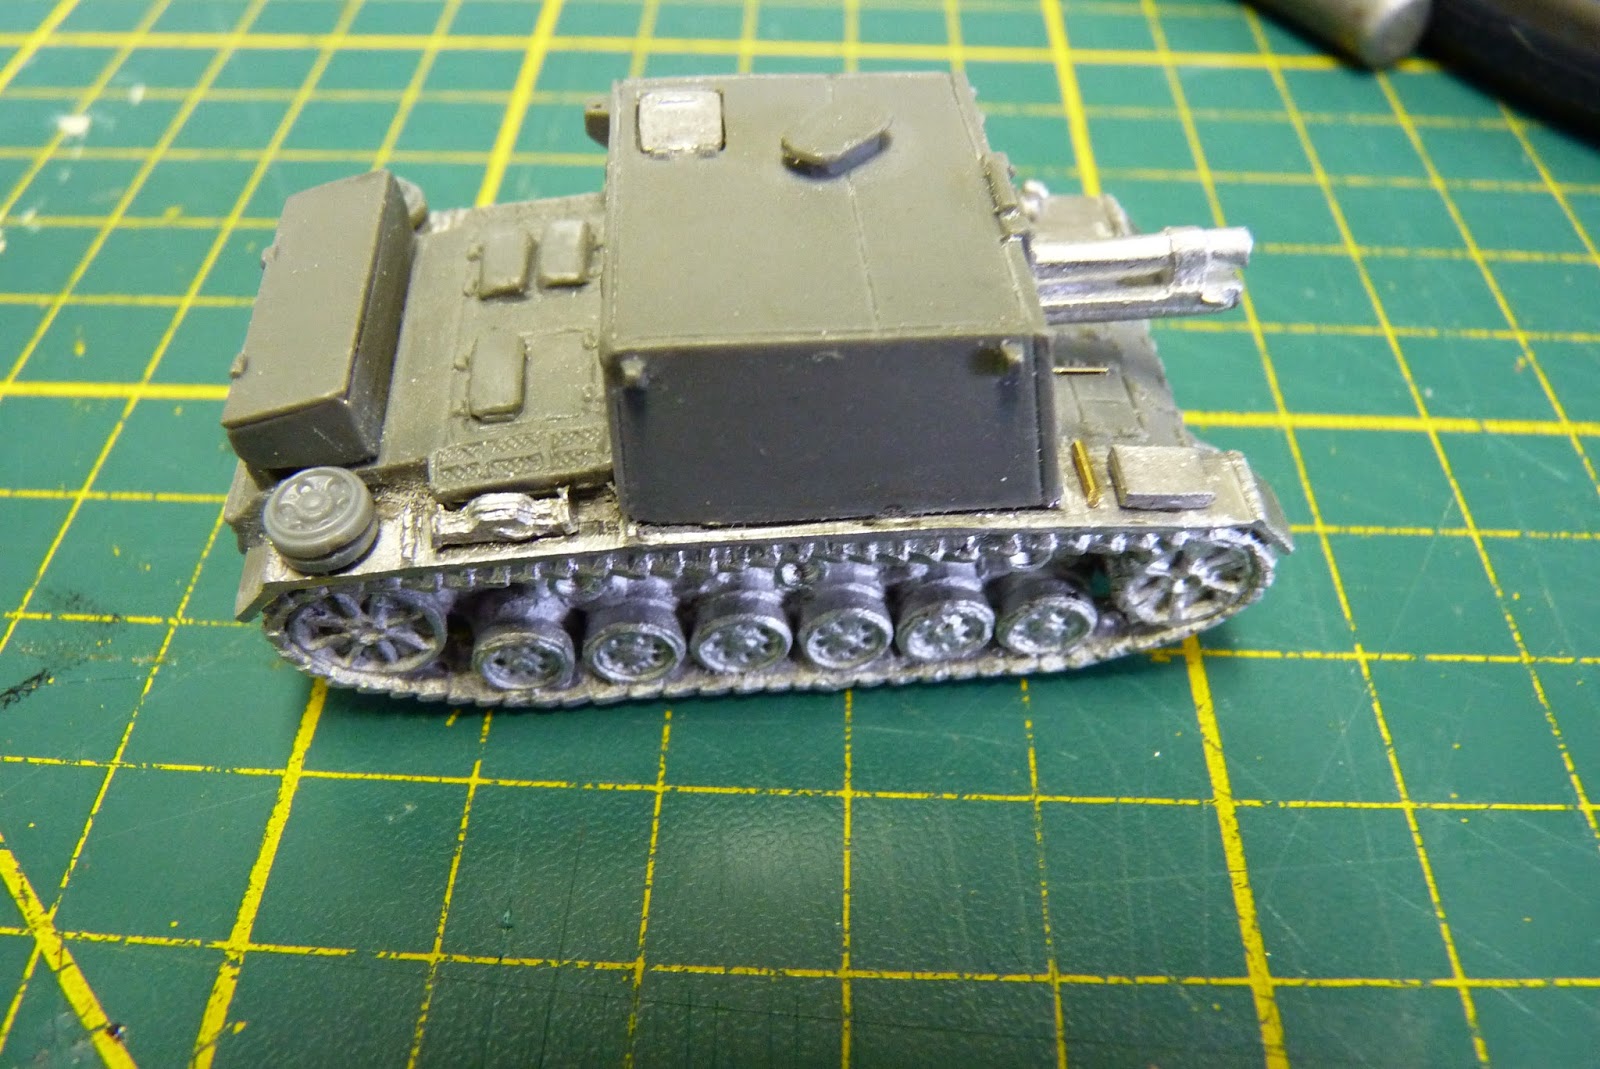
...and primed...


...whats that lurking in the shadows?

Cheers!

Troy

Wednesday, July 23, 2014

Buildin' Bloggin' Part II: Cork Buildings and SMoGs

Hey All!

I finally got around to finishing up a bit of Stalingrad terrain to fight over - and this time it didn't end up in the garbage! I found a few pics on the net of terrain made from 1 x 1 foot cork tiles.  Looked great and seemed simple...a trip to the Dollar store secured 2 tiles for 2 bucks and a 2 days later, I had 3 buildings! They are light-weight and durable and can be built as large or small as you like.
Cutting with a drywall knife was easy and gluing with PVA produces a strong bond. I used pins to hold in place until dry. But the best thing about the cork (over anything else I have tried) is the beautiful crumbled concrete look that is produced by simply breaking off chunks! Also, bullet holes are a snap - just dig into the wall with the tip of a pin and pop out!
I added some cardboard trim from cereal boxes, some hand-painted slogans and a few propaganda posters to flesh these out. Once complete, I brushed on a coat of thinned PVA to strengthen.
Floors and walls were positioned with miniature placement as a determiner so some simplification was required.  Rubble was a mix of sand, kitty litter. I will probably put these buildings on a removable base so the bottom floor can be used with ease.  Still working on how to add brickwork to future creations...
  Above are my finished SMG squads (SMoGs as my buddy John calls them). I added various scratch-built items and rubble to give them a Stalingrad-era look.
Cheers!

Troy

Thursday, June 19, 2014

Undercoating Minis: Black or White? PART III

Once You Go Black...

Hey All!

As a final installment to this primer/undercoat series, I can sum it all up to this, once you go black, its really hard to go back to a different color. The issues with grainy white showing through the paint layers just don't happen with black. As well, I find Vallejo colors just look truer over black especially the first coat.

Pictured above are two figures, left, black undercoated and right, white. I had to do three layers to get the base coat to cover the white completely, only two on the black. The use of black reduces my painting time and for someone who only paints a figure a day, this helps a lot! I have settled on:

Black Krylon Dual Superbond, using two coats with a couple hours between coats for a super-durable base-coat. At around 6 bucks a can, this will be my choice for all basecoating from now on.

These figures are for my Soviet Storm Squads to flesh out my Stalingrad forces. Great Battlefront figures although short and fat, they are similar to the BF Rifle-armed Infantry in stature and size. A few are too-short and have absolutely no neck. I added a new head to a few of these (above second from right) so they are usable. Also changed the Molotov-thrower to a grenade-thrower which was a simple change with an x-acto. I have again mixed in a few Greatcoated figures to add variation.


Many WWII painters have a certain color that eluded them despite their best efforts (Dunkelgelb anyone?).  Mine is the color of both the wrap and Shinel Greatcoat. Spent waaaay too much time staring at color swatches! I settled on the 'Brown variation' 50% Burnt Umber 941 + 50% USA Tan Earth 874 combo.
Other colors are as per my Recommended Colors link on the top-right of the blog with the pants mostly Khaki Grey and shirts, Middlestone. I painted in a few chinstraps on those figures that had issues with facial detail or looked too plain although they should probably all have them.

Cheers!

Troy

Saturday, June 7, 2014

Undercoating Minis: Black or White? PART II

Hey All!

The figure on the left is undercoated white; the right one in black. I painted the two figures at the same time and here are my observations:

1. Black is easier to block-paint without trouble getting into all the nooks and crannies.
2. Finished look is about the same regardless of primer used although I did find I had extra work (extra layers) covering the white undercoat.
3. With my current choices, the white undercoat is stronger and has better bite to it. See below...

One thing about undercoating minis with lead content or softer metal is that the paint must have a good bite to it and be able to pass my 'scratch' test. This is simply to paint the mini in the undercoat and allow to dry overnight. Once dry, I lightly run my fingernail over the helmet three times. If the undercoat stays, its strong enough for wargaming. Sadly both the Armorcoat and Krylon did not pass muster. The Krylon was worst of all, coming off in big flakes. I am still looking for a stronger black paint and will try some of the automotive primers.


Pictured above is my old standby Flat White Tremclad and the test subject blacks.

Each test mini was given a single coat of well shaken paint and allowed to dry overnight. Each is rated from 1 to 4 with 1 best. Here are the results:

BRAND
NOZZLE
FINISH
ADHESION
COVERAGE
Tremclad Rust Paint
Flat White
4. Very coarse
1. Dead Flat
1. Excellent
1. Single pass -too much paint
Armor Coat Enamel
Flat Black
1. Ultra-fine
4. Satin
4. Poor
3. Three passes
Krylon Indoor/Outdoor
Flat Black
2. Fine mist
4. Satin
4. Poor
2. A couple passes
Krylon Dual Paint and Primer Flat Black
2. Fine mist
2. Flat
2. Very Good
2. A couple passes
Dupli-color Sandable Primer Flat Black
2. Fine Mist
3. Slight sheen
3. Good
4. Multiple passes

Overall, I liked the Krylon Dual best. Its lower price and good adhesion make it  the clear winner. One thing that may make a difference is that each paint took different amounts of passes to get good coverage and this may mean that 2 coats may make the product work better than a single.

Cheers!

Troy


Saturday, May 31, 2014

Undercoating Minis; Black or White, PART I

Hey All!


One thing about painting miniatures; you will not improve much if you are not willing to try out new techniques and with this in mind, I embark of a test of sorts.

Traditionally, I have used flat white spray paint as an undercoat for all my minis. I do not use 'Primer' as it will fill-in detail and in 15mm, this is a problem. I prefer to top-coat with a varnish to give the finished mini's paint job durability.

White undercoating, in theory, gives the mini a brighter overall finish but I wonder if the opposite is true. Will black absorb the dark from the paint and cause the color to appear brighter? One issue I am having with white undercoat is that you have to re-paint all the crevice's and deep shadow areas as any missed areas are glaringly obvious.

Another problem I am having is that the white primer shows through the top coat. While this can be desirable for some things, generally it forces me to do at least two coats of Vallejo to completely cover the undercoat.

I have decided to try two brands of flat black paint to undercoat three minis each and relate the experience. I grabbed six Pionere figures and two types of flat black spray paint.  The brands chosen: Krylon and Armorcoat. I found the Armorcoat to be cheaper in price but better misting than the Krylon but I suspect the Krylon will stand up better to the scratch test.

Once undercoated, I left the minis to dry overnight. Another observation, I was able to spot a fine casting line that I would have missed with white undercoating (center figure) - thats a bonus! Also the flat is more of a satin for both brands.

Stay tuned...