Wednesday, July 3, 2013

Canadians - Eh?

Hey All!

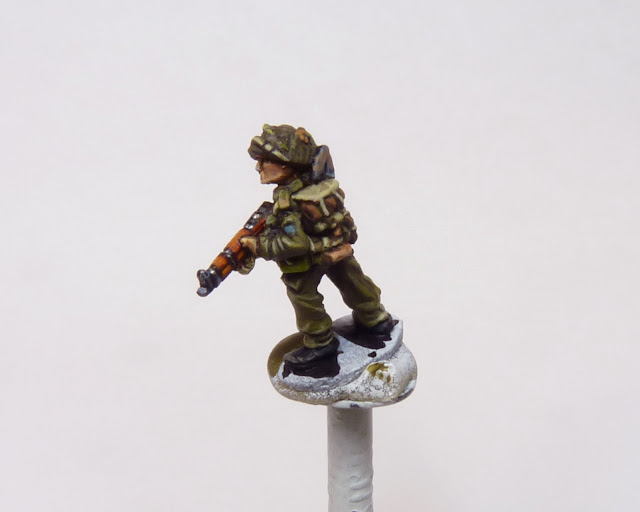
Felt a bit of patriotism on Canada Day so decided to do a test run of some Canadian Troopers (and take a break from Germans and Russians!)  I wanted to solidify color choices so mostly worked on one figure.  I bought the BBX11 British Rifle Company a few years back with the plan that at some point I would do up a D-Day Canadian force fighting in Normandy.


The sculps are a bit blocky typical of BF style and are pretty good overall with the only major bitch (am I ever happy?) is the Mk.III ‘turtle’ helmet modelled. On many of the figures, it is more flat on the sides than it should be. I played around a bit with one figure, scraping off the netting and adding one made of nylon stocking (stole from the wife - not mine...really!) 


All my color choices for these figures will be updated in the "Recommended Colors" link on the left side of the blog.

I plan on painting them up to represent the 3rd Canadian Division, specifically the Royal Winnipeg Rifles of the 7th Infantry Brigade. The divisional patch is a blue/grey square with the Regimental patch above it. in a black arc with white lettering.


The advancing bren gunner pose (center minis - below) is  a bit dwarfish. I removed the legs on a couple otherwise great looking minis and added some bulk with epoxy. I then attached some longer legs from two spare riflemen. The different legs and a new head make it difficult realize that theses are the same mini. You can really make your figures unique with simple conversions.
These sculpts are unique in that they are the only ones modelled with the bi-pod folded back - not forward - which BF chooses to do with most of the Brens to strengthen the barrel (see figure below-left). 

Personally I wish BF would model the Bren bi-pod back as this is the most common method seen in pictorial evidence. Ill be careful with the barrel ok? 

As well, I added a new head sculpt and a carrying handle on one figure that is missing on all of the Brens. 

Stay tuned...

Troy


Saturday, June 8, 2013

Marder Mash-up 2.0

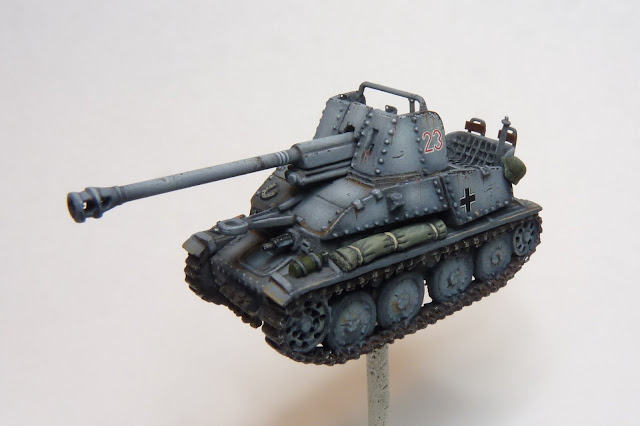
MARDER III UPDATE June 2013...

Hey All!

Marder finished with crew added:
Capped figure modified from Finnish stock, loader with a head transplant.
Painted in the extra details on the elevation handwheels - hard to see but looks the part and was easier than scratchbuilding the wheel spokes.
Nickle added at my wife's insistence for size reference.


 Now to finish up my Pioneres and Guards...


Taking a break from building terrain, I finally got around to finishing this Marder III that I began last year (!) on Fathers Day. My how the time does fly! I used Tamiya German Grey as a basecoat, Vallejo for everything else, Dom's for the decals and will be adding in a couple modified crew figures to the fighting compartment.

BTW, BF DID send the replacement body, no questions asked! Their customer service is in my opinion, without a doubt, the best part of their business!


Normally I use Tamiya for basecoating and panel highlighting and Vallejo for brushwork but while having a bitch of a time with my Iwata HP-SB Plus airbrush, I discovered a new way to airbrush Vallejo Model color. Instead of water/Windex/thinner, I used straight Winsor & Newton Acrylic blending medium. It keeps the paint from drying out in the airbrush but you must be careful to not to use too much pressure (20psi or less).  Due to the longer work time, the paint will spider-web out from the contact point if oversprayed.


The wheels and running gear on this mini were as many other BF products, very poor. I must say though, the new plastic running gear on the Panzer IV J is light years better so here’s to hoping BF remasters the tracks on their best sellers…


Rivet detail and such are a bit un-symmetrical but overall, give the impression of the bumpy surface of the Marder III. The amount of scratchbuilding added to this vehicle was more than I do normally and isn't recommended for the casual gamer but does add lots of interest to an otherwise average-looking mini.


I went substantially lighter than normal to compensate for the apparent darkening of colors when flatcoated with Vallejo Matt. I also added in a light buff to the base coat and panel-highlighted to represent settled dust. Although I did add a bit of mud, I didn't want to overpower the onderlying paintjob. I also added grease trails on the running gear that show up in many pictures of the Czech Pz.38(t) chassis in period photos.

Cheers!

Troy

Hey All.


I had a bit of time this weekend - happy fathers day - to do some scratchbuilding to a favorite subject of mine, the Marder.

I began by digging out a couple of Battlefront GE104 Marder III (7.62cm) blisters I bought a few years back and discovered that one mini had a very bad cast track and many air bubbles on the chassis. I fired off a email to BF's customer service and decided to build the good one while waiting...One thing that occurred to me was that I usually do not open a blister until I am ready to build it but one should as there may be parts missing upon closer examination! I hope this is not an issue with BF!

I decided that the sparse mini needed some sprucing up...

I began by drilling out the holes on the chassis drive and idler wheels. I also drilled out the small holes in the perforated fender stowage box. As the gun is fixed it stands a pretty good chance of being bent by gamers so, although well detailed,  I replaced it with brass tube. I also hollowed out the muzzle break.


 As per reference photos, I added tools to both fenders, wire cutters, hammer, and shovel. Also I removed the molded on Notec light and replaced it with  a fire extinguisher. As well, I added a second one to the rear of the fighting compartment.  
A spare gas can, helmet and pail rounded out the rear of the vehicle. I reinforced the pail with a block of solder to prevent its removal by less than careful gamers.
Many small details were added to the fighting compartment including elevation wheels, cocking handle, gunshield bracing, right side breech shield, gunsight, periscopes, spare rounds and a gas mask container. I plan on simply painting in the wheel detail on the handwheels later...
I added a tarp to the left side as well as tarp stands to the crew compartment. The iconic ZB53 (Besa) hull MG detail was pretty slim so I remade it with thin wire wrapped around a flared-out piece of solder. I wrapped this in a foil shroud and installed.

Must resist the urge to scratchbuild the rear seat...Currently I am looking for crew figures in more action poses...stay tuned!

Troy

Wednesday, May 1, 2013

Buildin' Bloggin'

Hey All!
A running entry on a pet project of mine, namely the Battle of Stalingrad. Pictured above is my first attempt at a ruined building using foamcore board, cereal box cardboard and PVA glue mixed with drywall mud. The design is rather simple and I plan on adding more detail in the next one which I have posted below.

One belief I have about wargame terrain is that it has to be playable. Its no good if you have this wonderful terrain that your minis cannot sit properly on. For this reason, I try and think out what is needed and what will cause issues with mini placement. For example, if this were a real destroyed building, there would be piles of rubble and debris scattered around the footprint but this would not allow minis to be placed. What I plan on doing is making up some rubble edge and corner pieces and butting them up to the building. This allows the rubble to be shifted out of the way in order to place your minis. As well, on the next building, I will have a removable back that lets you place minis on the individual floors instead of having to disassemble stacked floors.


The next building will be based on 4-floor concrete apartment blocks seen in pictures of the battle. I decided to make a building based on this picture:


I begin with the next building by laying out the basic idea on the foamcore with pencil. I plan on adding in a removable back after so only designed the three sides. Approximate heights and outer walls are sketched in, window/door cutouts marked and once happy, I draw in the fold lines with a marker.  Just remember to put the lines on the opposite side for inside corners!


For working with foamcore, you need VERY sharp blades - and many of them. For general straight cuts, a drywall knife with snap-off blades will do but window/door cutouts will require an X-acto. When cutting the folds, only cut through the first layer of paper, then bend. You will get a strong corner on one side and will have to add either a paper/cardboard edge piece or square corner to cover the exposed edge on the other.

Once I got the folds figured out, I laid the building flat and cutout the windows and door. You have to cut past the edge so the corners are sharp and any cuts that show will get covered up with PVA/mud later.

I find that its best to cut on the building outside as the inside opening tends to be less square due to the angle of the blade through the foam.


So I had some time this morning to add on the building...I enlarged the bottom windows and added sills made from cardboard.  I then added outside corners made from square-cut basswood bought from Canadian tire for 1 dollar for 3 feet. As well I added some detail work around the door.


I marked out the areas that would recieve damage and cut them out.


 I didn’t realize how true this was going to be! I ran into a problem when I attached the floor. I used hot glue instead of PVA and the work time is very short. Even with the floor reference line, the glue set before I could align it properly.


 The floor was crooked and caused the building to sit uneven…now what? I tried to remove the floor but it caused the walls to buckle and then I had a melt down…and smashed the whole thing into the garbage…it was probably save-able...but not after I crushed it... 


You know...I learned something today; sometimes its better to have to wait on glue to dry instead of trying to rush with something else...Hot glue = destruction!

When I was younger I used to rush when building plastic models, not waiting till glue or paint dried to do the next step and see the finished product and the results were predictable. It wasn't until I watched a friend building a Stuka, the same one I was building, that I realized the patience needed to do a good job. In the time I built mine, he had only assembled and painted the wheels and bombs. He took the time to plan and paint parts before assembly. He removed the parts from the sprue with a hobby knife, I broke them off with my hand; He painted things and set them aside to dry, I tried to glue wet painted parts together...

Once I took the time, my models improved dramatically and I became much less frustrated and truly enjoyed building. I think I need to revisit this lesson...

Other things I learned...

- Ergonomic license will be needed to model ceiling height extra high so you can get your mitts inside to place minis.

- Don't try to model everything, including extra floors; two or three is sufficient, any more becomes fluff.

- Plan everything out and use reference photos.

- Maybe im drinking too much coffee?

I'm not giving up. I will start again on a similar building and add to this thread.

Troy


Monday, April 22, 2013

A New Direction

Hey All!
 
I have decided that due to ease of transport (read: I am tired of driving instead of flying) I am pursuing a different approach to terrain for gaming. Currently I am using 2x2 foot rubber mats that jigsaw puzzle together to form the base for modular terrain. The problem with that is it is pretty bulky to lug around and costs extra to get on the plane.

Looking around, I have decided to test out a terrain mat idea using acrylic caulk on a canvas drop-sheet. The canvas is pretty cheap and comes in varying widths so I bought a 4x16’ sheet at Canadian Tire for 15 bucks to do a 4 foot Stalingrad test piece with a couple 6 foot maps left over once I get the hang of creating. I stapled down the canvas to a piece of plywood to prevent shrinkage.


The paintable acrylic caulk is cheap (2-3 bucks a tube), water clean-up and is a bit tricky to work with but is extremely flexible when dry. Tube says 35 years…geez, I’ll be 77 years old when I have to redo my map! I chose an interior/exterior type that is earth brown in color. A four foot square mat used up 2 tubes to get 1/8 inch coverage.

In a paint roller tray, I squeezed out the content of the tubes and added in sand and tan acrylic house paint to get a bit of texture and a lighter color.  I don’t think I will add in the paint next time as I think it may weaken the caulk. The resulting goo is quite sticky and spreading is best done with a roller or a gloved hand. One word regarding the caulk, VENTILATION! I worked with a fresh air supply and a face mask filter that is rated for organic particulate. I am not sure how bad this stuff is but it does stink!
 

Once smooth, I covered the whole map with sand. I hand-pressed the sand into the caulk and dumped off the excess. I should have smoothed out the caulk a bit better as I noticed paint roller ridges and such but it still looks ok when done.  I scraped off a few roads with a spatula and then formed some shellholes by adding in more caulk, covering in fine sand and shaping as desired. That seems to work best for working in this medium, smooth out the basic shape, cover with fine sand or dry tile grout and then add final details.


I left for a few days to dry and then painted the entire map an earth tone with flat tan house paint. I added a brown wash and tan drybrush and then cut the edges square. The map is super durable and rolls up nice and easy. It can be put into a tube or folded into a suitcase without damage.


I plan on doing the next map with built-in roads first and then flock/static grass other areas to represent the steppe of Russia.

Stay tuned!

Troy

Salute 2013 Pictures

Hey All!

Some pictures of the recent Schwere Kompanie scenario 'Spartanovka' in Vancouver at the Trumpeter Salute 2013:


Cheers!

Troy